
Copying Files In PowerShell - Using Windows Explorer UI
I know this trick is widely known, but I thought it’s worth mentioning anyway.
If you use PowerShell’s Copy-Item to copy files, you don’t get any progress report, ETA or statistics like you do when using Windows Explorer’s file copy.
First, let’s generate a random file using fsutil. Note how PowerShell
makes things easy by translating “2GB” to “2147483648”:
fsutil file createnew big.file (2GB)
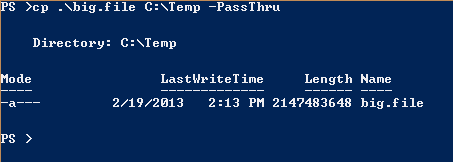
When we copy the file via Copy-Item, the best progress indication we can get is through the -passthrough flag to see a list of files copied:
Compared to Windows Explorer’s copy dialog:

I recently wrote a script that copies a lot of big files, and I wanted to spoil myself and get detailed information about the transfer - not just file names.
After a quick search, I wrote this method to copy files using Explorer’s Shell (represented as a COM object):
function Copy-ItemUsingExplorer{
    param(
        [string]$source,
        [string]$destination,
        [int]$CopyFlags
    )

    $objShell = New-Object -ComObject 'Shell.Application'
    $objFolder = $objShell.NameSpace((gi $destination).FullName)
    $objFolder.CopyHere((gi $source).FullName,$CopyFlags.ToString('{0:x}'))
}
Replacing CopyHere with MoveHere will trigger a move operation instead.
More reading about CopyHere (including the options offered by CopyFlags) - Here
Happy Scripting!